SureLockDocumentation

What is SureLock?
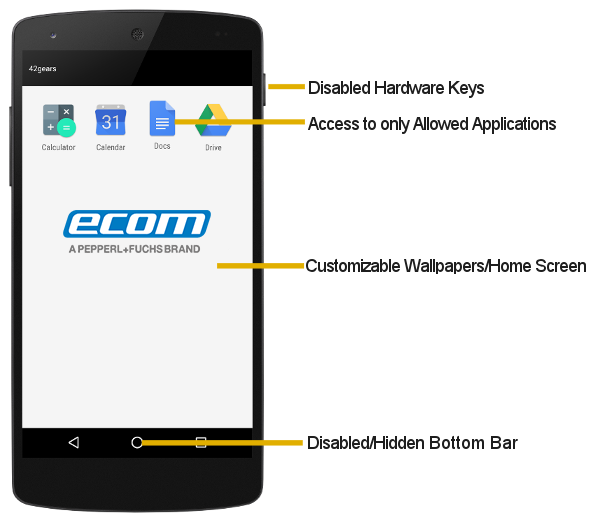
Businesses with mobile workforce require secured and locked mobile device to ensure responsible usage, improved productivity and reduced device maintenance cost. One of the ways to achieve above mentioned objectives is by allowing access to only required applications for users and preventing them from making any intended or unintended changes in the device. With SureLock, only the approved applications are allowed to run on the device and only the administrator can access the password protected settings to either modify settings or exit lockdown.
How does it work?
Download and install SureLock on your Android device. Access the password protected SureLock Admin Settingsand specify the applications you wish to approve. Return to SureLock Home Screen, only the approved applications will be listed on the screen. This confines the device users to only SureLock Home Screen with approved applications and is restricted from accessing device home screen, device settings and SureLock lockdown settings.
Key Features
- Lock down Android smartphones and tablets in Kiosk Mode
- Restrict users to only Allowed Applications
- Block user from playing games, browsing or installing unapproved applications
- Hide or Disable Bottom Bar
- Show only selected Widgets (e.g. battery, Wi-Fi, weather etc.) on SureLock Home Screen
- Arrange Allowed Applications in categories on SureLock Home Screen
- Block user from changing Device Settings
- Selectively allow or block individual child windows of any application
- Password protect launch of Allowed Applications
- Brand SureLock with your own corporate logo/wallpaper
- Auto Launch application(s) at Startup
- Custom title for Allowed Applications on Home Screen
- Hide icon of an Allowed Application on Home Screen
- Peripheral Lockdown (Wi-Fi, Bluetooth, Auto-orientation, Flight Mode, Audio, GPS, Mobile Data)
- Modify SureLock Settings using MDM solution like SureMDM
- Option to Whitelist/Blacklist phone numbers
- Relocate icons anywhere on the screen using drag and drop
- Import/Export SureLock Settings
- Remotely deploy SureLock configuration (http/cloud/file transfer)
- Driver Safety features
- Easily integrates SureFox (Special lockdown browser to restrict browsing to only certain websites)
- Multi Users feature to enable multiple users sharing single device with respective lockdown profiles
Getting Started with SureLock
SureLock can be downloaded from following sources:
Launch SureLock
To launch SureLock, follow these steps:
1. Tap the SureLock icon to launch.
2. On SureLock Kiosk Lockdown welcome screen, go through the details and select SureLock as the home app.
3. On Setup SureLock Permissions screen, select Set SureLock as Default Launcher and tap Continue. To know more about SureLock Permissions, see Setup SureLock Permissions.
SureLock Home Screen will appear on the screen.
Access SureLock Admin Settings
To access SureLock Admin Settings, follow these steps:
1. Launch SureLock. 2. Tap SureLock Home Screen for 5 times within 3 seconds to launch the password prompt. 3. On the password prompt, enter SureLock default password as 0000(four zeros). To change the password, see Change Password.
Note: Exit SureLock option will be available only for trial version of SureLock.
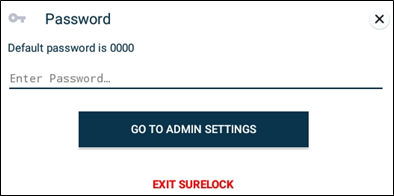
On successful login, SureLock Admin Settings screen will appear.
Note:
i. Alternate option to access SureLock Admin Settings is to tap the Back button 5 times.
ii. If SureLock is continued to be in the trial version and each time when the user enters the password, a pop-up appears to indicate the user to avail SureLock’s free full feature trial version for 7 days. Tap Sign up for FREE full feature trial option and fill the relevant details and then tap Submit or Sign up using Google/Facebook/LinkedIn to get a free trial for 7 days.
Configure Admin Settings
Admin Settings provides options to manage and control the lockdown settings.
Quick Setup to Lock Down the Devices
Quick Settings helps the user to quickly lock down the device with approved applications and configure basic settings.
To lockdown the device using Quick Settings, follow these steps:
- Launch SureLock
- On SureLock Admin Settings screen, tap Quick Settings.All installed applications will get listed.
- Select the desired application for the lockdown.
- Go to Peripheral Settings using the arrow at top right corner of the screen.
- Select the desired peripherals and apply changes.
- Go to Home Screen Settings using the arrow at top right corner of the screen.
- Select the desired Application Icon Size.
- Enter the Title for Home Screen.
- Select the Wallpaper for Home Screen.
- Go to Finish screen using the arrow at top right corner of the screen.
- Tap Launch icon/button.
On the successful launch, SureLock Home Screen will appear.
Note: Quick Settings is enabled for single user mode only. It will not support for Multi-user mode.
Allowed Applications
Allowed Applications option displays the list of applications that are approved on the SureLock Home Screen. The admins have the options to approve and allow more applications, edit or organize the allowed ones by assigning them to a specific folder.
Add Allowed Applications
Add App option lists all the installed applications on the device. The user can use this list to select and allow approved applications.
To add an Allowed Application(s), follow these steps:
- Access SureLock Admin Settings.
- On Admin Settings screen, tap Allowed Applications.
- On Allowed Applications screen, tap Add App to launch the list of installed applications.
- Select the required application(s) to allow from the list and tap Done. List of all approved applications will be displayed under Allowed Applications screen. Note: The apps installed in the device are listed under different categories such as All Apps, Downloaded Apps, System Apps, Services, Plugin Apps.
- Tap Done to return to Admin Settings. Once done, the user can see the icons along with titles of all allowed applications on SureLock Home Screen.
Plug-in App
Few plug-in apps come preinstalled with SureLock such as Wi-Fi Center and Bluetooth Manager. Admins can allow access to these plug-in apps by adding them to the allowed applications and use it like any other applications on SureLock Home Screen. These apps are helpful when the admin wants to give access to only specific device settings. For example, if the locked device is always on the move and has to connect to different Wi-Fi networks, the admin can allow plug-in app called Wi-Fi Center which enables the device users to use Wi-Fi settings without accessing device settings.
Following Plug-in apps are available in SureLock:
- Bluetooth Manager
- Brightness Settings
- Security Manager
- Settings Manager
- Phone Manager
- Wi-Fi Center
Bluetooth Manager
With this plug-in app, admin can allow the user to have access to following Bluetooth functionalities on the device:
- Turn ON/OFF Bluetooth option.
- Pair with the devices under Available Devices.
- Change password to access Bluetooth functionalities
- To configure Bluetooth settings in Bluetooth Manager plug-in app, follow these steps:
- On the SureLock Home Screen, launch Bluetooth Manager.
- On the Bluetooth Manager screen, tap Settings icon.
- Enter the password and click OK.
- Configure Bluetooth Settings:
Device Types - Allow or block access to various device types (Phone/Wearable/Toy and more) those are connected to Bluetooth.
Change Password - Change the default/existing password to the desired password.
Brightness Settings
With this plug-in app, admin can allow the user to have access to set phone brightness levels of the device screen.
Settings Manager
With this plug-in app, the admin can allow the user to perform the following actions:
- Turn Mobile Data ON or OFF
- Turn Data Roaming ON or OFF
- Switch between the SIMs
- Note: This feature will be supported only on platform signed devices.
- Configure Screen Timeout
Phone Manager
With this plug-in app, the admin can allow only the whitelisted contacts configured in Phone Settings.
WiFi Center
With this plug-in app, the admin can allow the user to access certain Wi-Fi related functionalities on the device. Admins can use this plug-in app to configure multiple network connections.
To configure WiFi Center settings, follow these steps:
- On SureLock Home Screen, launch WiFi Center plug-in app.
- On the WiFi Center page, tap Settings icon.
- Enter the password.
- Configure the following WiFi Center Settings.
| Settings | Description |
| Load default URL when connected to open network | Select this option to launch the default URL when connected to an open network. |
| Launch webpage when connected to open network | Select this option to launch the specified webpage URL when connected to an open network. |
| Webpage URL | Enter the Webpage URL that will be launched when connected to an open network. |
| Change Password | Change the default or existing password to the desired password to access WiFi Center Settings. |
| Hide Forget Button | Hides Forget Button for the connected network. |
| Hide IP Settings | Hides IP Settings option for the connected network. |
| Hide Use Proxy Settings | Hides Use Proxy Settings option for the connected network. |
| Allow connection to Open Network | Allows connecting to an open network. |
| Launch WiFi Center on loss of WiFi connectivity | Allows launching of WiFi Center within the specified time when WiFi connection is lost. |
| Turn ON Mobile Data on loss of WiFi Connectivity | Allows connecting to a network through mobile data when WiFi connection is lost. Note: This feature will be supported only on platform signed devices. |
Edit an Allowed Application
The user can edit different aspects of allowed applications such as Label, Icon, Password, Hide Icon in Home Screen.
To edit an Allowed Application, follow these steps:
- Access SureLock Admin Settings.
- On Admin Settings screen, tap Allowed Applications.
- On Allowed Applications screen, tap Edit icon of the application.
-
On Application Settings screen, the user can edit the following options:
Label - Name of the application
Icon - Icon image for the application
Password - Access application by setting a password
Hide Icon in Home Screen - Hide application’s icon in Home Screen
Launch at Startup - Launches the application when the device is switched ON
Restart app on relaunch - Restart the application on its relaunch
Clear Data on Launch - Clears the data on application launch
Note: To enable Clear Data on Launch requires device rooting/platform permission.
Allow Child Windows - Restrict or allows the access to a specific child windows of the application.
For example, Camera app can be used to capture both photo and video. The admins can use this feature to restrict the video camera by disabling the video camera child windows.
Current Path - Path of the folder in which the application is saved. This is helpful if the allowed applications are arranged in folders.
App Idle Timeout - Configure a specific period of device inactive time after which SureLock will auto-redirect the device screen to SureLock Home Screen.
Note: To configure App Idle Timeout, enable Idle Timeout option under Admin Settings > SureLock Settings > TimeOut Settings.
- Tap Done to complete.
Remove an Allowed Application
To remove an allowed application from SureLock Home Screen, follow these steps:
- Access SureLock Admin Settings.
- On Admin Settings screen, tap Allowed Applications.
- On Allowed Applications screen, tap the application to delete.
- On Application Settings screen, tap Remove to complete.
Add a Folder
Add Folder option allows the admins to create folders on SureLock Home Screen. The admins can assign and organize approved applications in these folders.
To arrange approved applications in a folder, follow these steps:
- Access SureLock Admin Settings.
- On Admin Settings screen, tap Allowed Applications.
- On Allowed Applications screen, tap Add Folder and enter a name for the folder.
- Tap OK to create a folder.
-
Tap on the folder to open and follow steps mentioned in Add Allowed Application to add approved applications to the folder.
The folder created will reflect on SureLock Home Screen with approved applications.
Note: To move an existing approved application to a folder, edit Current Path of the application to that of the desired folder.
Edit or Remove Folder
To edit or remove an existing folder, follow these steps:
- Access SureLock Admin Settings.
- On Admin Settings screen, tap Allowed Applications.
- On Allowed Applications screen, long tap on the folder to edit /remove.
-
On Folder Settings screen, admin can edit the following options:
Label - Name of the folder
Icon - Icon image for the folder
Landscape Wallpaper - Wallpaper for folder when in landscape mode
Portrait Wallpaper - Wallpaper for folder when in portrait mode
Password - Lock password for the folder
- Tap Ok to edit the folder.
- Tap Remove to delete the folder.
Allowed Websites
Allowed Websites helps the admins to install SureFox application on the device home screen. SureFox can be downloaded from following sources:
Configure SureLock Settings
SureLock Settings offers features to customize SureLock Home Screen such as advance lockdown of a device, peripherals settings, timeout settings and more.
Configure Wallpaper Settings
SureLock Home Screen can be personalized with a wallpaper. The admins can set two different wallpapers for SureLock Home Screen; Landscape and Portrait.
Wallpaper Settings has following options:
1. Wallpaper - Use Wallpaper option to set wallpaper for SureLock Home Screen and Device Lock Screen. The user has the option to set same or two different wallpapers for Landscape and Portrait mode and also set wallpaper for the Lock screen.
- To configure a wallpaper, follow these steps:
- On Admin Settings screen, tap Sure Lock Settings.
- Select SureLock Settings > Home Screen Settings > Wallpaper.
- Tap Landscape or Portrait Wallpaper.
- Tap on browse icon to select a wallpaper image from Drive/Gallery/Photos.
- Tap Lock screen Wallpaper to browse and select the desired image from Drive/Gallery/Photos.
- Tap Loading screen Wallpaper to browse and select the desired image for the loading screen.
- Tap Customize Loading Screen to change loading screen message and enable progress bar and spinning wheel.
2. Wallpaper Position - Use Wallpaper Position option to specify and set the position of the wallpaper. The user has the following options to select from:
- Center
- Fill 3. Use System Wallpaper - Select Use System Wallpaper to set system wallpaper as SureLock Home Screen wallpaper.
4. Background Color - Enter Hex color code or select a color from the color picker to apply background color for SureLock Home Screen.
Configure Display Settings
Display Settings offers a range of features that can be used to customize the look and feel of the SureLock Home Screen and approved applications.
Row and Column Size
Row and Column Size option will change the SureLock Home Screen grid size to specified value. This option is available for both Portrait and Landscape mode.
Icon Size
Icon Size option will set the size of approved applications’ icons on SureLock Home Screen. The user has following options to select from:
- Small (50%)
- Medium (100%)
- Large (200%)
- Extra Large (400%)
- Custom - Enter the desired value for the icon size can range between 10 and 600.
- Original - Displays icon with the actual resolution.
Font Size
Font Size option will set the font size of approved applications’ titles on SureLock Home Screen. The user has the following options to select from:
- Same Icon size
- Small (50%)
- Medium (75%)
- Large (100%)
- Custom Font Size - Enter the desired value for the text size
Use Classic Calculation
Classic Calculation option will use the older algorithm to calculate icon size.
Spacing between the Icons
The Spacing between the icons option will allow the user to specify space between the approved applications’ icons on SureLock Home Screen.
Note: The value for the spacing between the icons can range between 1 and 50.
Text Color
Text Color option will set text color for approved applications’ titles on Surelock Home Screen.
Apps Order
Admin can set the order of the apps on the home screen with following options:
- Alphabetical - Allowed Applications will be displayed in alphabetical order on the SureLock Home Screen.
- Sequential - Allowed Applications will be displayed in the sequence of applications added to the allowed applications list on SureLock Home Screen.
Allow Icon Relocation
Allow Icon Relocation option will allow relocation of the icon on the SureLock Home Screen. This option once enabled will let the user drag and organize icons on the home screen. Admin can enable this option, arrange the home screen and later disable it to retain the layout on the device.
Detect Network Connection
Detect Network Connection option once enabled will redirect the user to SureLock Home Screen when an offline device connects to a network and goes online.
Full Screen Mode
Full Screen Mode option will auto hide Status Bar and extend the display to fit the complete screen of the device.
Note: Status Bar is the bar on top of the device screen which shows details about battery level, network strength and time.
Notification Badge
Use Notification Badge to enable a small red notification count badge on the application icon. This icon will notify the user of new messages/emails/call count.
The purpose of this feature is to let the user know the number of unread alerts or notifications for allowed applications.
Note:
i) This feature is supported only on Samsung KNOX devices (KitKat and above).
ii) This option will be in disable mode by default.
Hide App Title
Allowed applications will display as icons with their respective titles on SureLock Home Screen. Use Hide App Title option to hide the title and display only icons of the approved applications on SureLock Home Screen.
Floating Buttons Settings
Floating buttons are icons floating above the user interface on the screen. SureLock offers the feature to add a floating button on the screen with following options:
Home, Back, Print and Recent
Note: Floating Back button is supported only on Samsung KNOX devices, rooted devices or devices which are platform signed.
To add Floating Buttons on the screen:
1. Access SureLock Admin Settings.
2. On SureLock Settings, tap Floating Buttons Setting.
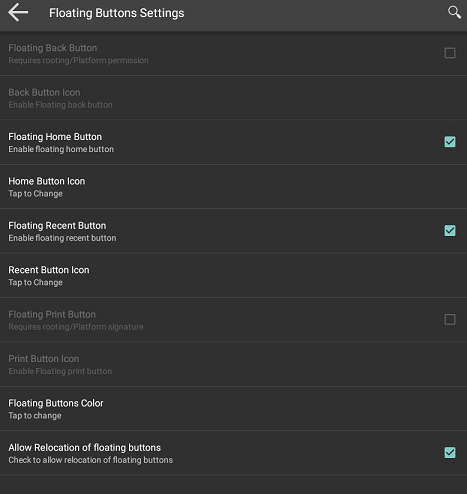
3. On Floating Buttons Settings screen, select the following:
-
a. Enable Floating Back Button and select desired options from the following:
-
Floating Back Button
-
Floating Home Button
-
Floating Recent Button
-
Floating Print Button
-
-
c. Tap Floating Buttons Color to pick a color for the icons.
-
d. Tap Allow Relocation of Floating Buttons to allow relocation of floating buttons anywhere on the screen.
4. Tap Done to complete.
Configure Single Application Mode
Single Application Mode refers to a state of device lockdown in which there is only one application on the screen. With just one application in the foreground, access to Home Screen Settings or other apps will be blocked at all time.
To enable Single Application Mode, follow these steps:
-
Launch SureLock.
-
On SureLock Home Screen, tap 5 times within 3 seconds to launch the password prompt.
-
Enter your default password – 0000 (four zeros) and tap Ok.
-
On Admin Settings screen, tap Allowed Applications.
-
On Allowed Applications screen, tap Add App to add the desired application in Single Application Mode.
-
Tap Done to go back to Admin Settings.
-
On Admin Settings screen, tap SureLock Settings.
-
On SureLock Settings screen, tap Single Application Mode and enable Single Application Mode option.
Note: Please read the precautionary message before you tap on Ok.
-
Go back to SureLock Home Screen.
The approved application will run in Single Application Mode.
To enable this feature, only one approved application should be visible on SureLock Home Screen. If any other applications need to be allowed then they must be hidden. To hide an application, see Edit an Allowed Application.
Exit Single Application Mode
To exit from Single Application Mode, follow these steps:
-
Reboot the device.
-
When SureLock is loading, tap on the screen for 5 times within 3 secs to launch the password prompt.
Or Tap 10 times on foreground application to launch the password prompt.
Note: These options are available only once and to activate it again, the user has to reboot the device.
-
On Admin Settings screen, tap SureLock Settings > Single Application Mode.
-
Disable Single Application Mode option to complete.
Application Launch Delay
SureLock allows the user to delay the launch of Single Application Mode after the specified time.
Note: The default time set for the delay of the launch of Single Application Mode will be 500ms.
Run Only Once
Once this option is enabled will allow running of Single Application Mode only once. On reboot of the device, Single Application Mode will automatically get disabled.
Create Single App Mode Exit File
This option creates Single App Mode Exit File and gets saved in the specified path. This file can be pushed using MDM solution like SureMDM. Once the user creates this file and pushes to the device, Single Application Mode will be disabled for first 10 minutes.
Enable Password Prompt
This option will enable the user to launch password prompt by tapping 10 times anywhere on the screen when an application is running in the foreground on Single Application Mode.
Configure SureLock Settings
SureLock Settings allows the admins to edit and set general settings in SureLock.
Change Password
Password to access SureLock Admin Settings can be changed using Change Password.
Note: In case of forgotten password, the user has to factory reset the device.
To change the Password, follow these steps:
-
Access SureLock Admin Settings.
-
On SureLock Settings screen > SureLock Settings, tap Change Password.
-
Enter the existing Old Password.
-
Enter the New Password.
-
Enter the New Password again in Confirmation field.
-
Tap Change to complete.
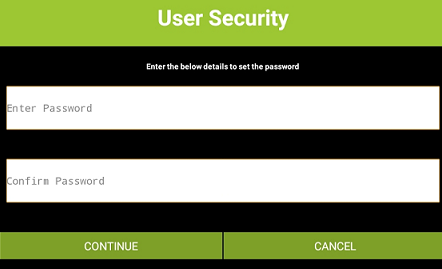
User Security
SureLock will force the user to set a password to access the Home Screen when User Security option is enabled. User login screen will be displayed after the specified idle timeout interval and the user can access SureLock Home Screen only after entering the valid password.
To set a password to access the SureLock Home Screen, follow these steps:
- Access SureLock Admin Settings.
- On SureLock Settings screen, select User Security.
-
On User Security prompt, select Enable and tap Done.
User Security screen will appear.
-
Enter desired Password and type same password in Confirm Password field and tap Continue.
Security questions will appear as shown below:
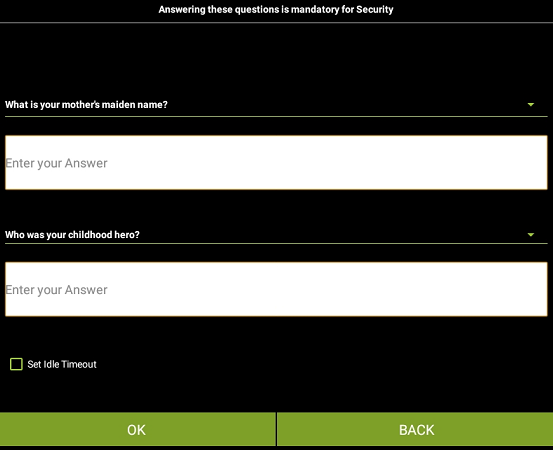
- Select desired questions from the drop-down list and enter the relevant answers.
- Select Set Idle Timeout and enter the value in seconds / minutes and tap Ok. Note: User login screen will appear after the specified idle timeout.
Admin Users
SureLock can be accessed by more than one admin user to configure the device and lockdown settings. Multiple admin profiles with different passwords can be created for multiple admin users. They can use their respective passwords to access SureLock Admin Settings to edit or update settings.
Admin Users will have access to all settings except for following five options under SureLock Admin Settings:
- Exit SureLock
- Uninstall SureLock
- Change Password
- Admin Users
- System Settings
Add an Admin User
To add Admin User, follow these steps:
-
On SureLock Settings, tap Admin Users.
-
On Admin User Settings screen, tap Add User.
-
Enter the Name, Description, and Password.
-
Tap Save to complete.
Edit an Admin User
To edit Admin User details, follow these steps:
-
On SureLock Settings, tap Admin Users.
-
On Admin User Settings screen, tap Admin User.
-
On Admin Users screen, tap on a specific admin user.
The details of the selected Admin User appears.
-
Tap on the specific fields to edit the details.
-
Tap Save to complete.
Delete an Admin User
To delete Admin User, follow these steps:
-
On SureLock Settings, tap Admin Users.
-
On Admin Users screen, tap on a specific admin user.
The details of the selected Admin User appears.
-
Tap Remove to complete.
Multi-User Mode
Multi-User Mode option is helpful to maintain applications separately for different users. A single device can be shared among multiple users with the option to switch between different work profiles.
How to enable Multi-User Mode
To add multiple users, download SureLock and follow these steps:
-
Launch SureLock
-
Tap SureLock Home Screen for 5 times within 3 seconds
-
On the password prompt, enter SureLock default password as 0000 (four zeros) to access SureLock Admin Settings.
-
Tap SureLock Settings.
-
On SureLock Settings screen, enable Multi-User Mode.
-
Tap Done to go back to Admin Settings screen.
-
Tap Allowed Applications.
-
On Allowed Applications screen, tap Add User.
-
Enter the User Name and tap Ok.
-
To add multiple users, repeat steps 7 to 9.
-
Tap Done to complete.
Add an Allowed Applications to a specific user
To add an Allowed Application to a specific user, follow these steps:
-
Access SureLock Admin Settings.
-
On Admin Settings screen, tap Allowed Application.
-
Tap User Name.
-
To add Allowed Applications to the user, See Add an Allowed Application.
Once done and return to SureLock Home Screen, the user will now see separate icons with different users. The device users just have to tap their respective icon and assigned work profile to log in using their respective password.
Note: The default password for any user profile will be four zeros ‘0000’. To set a different password, follow these steps:
i. Access SureLock Admin Settings.
ii. On Admin Settings screen, long tap on a specific user.
iii. Type the password in Password field.
To log out or switch to another user profile, tap Back button.
Delete a User
To delete a user, follow these steps:
-
Access SureLock Admin Settings.
-
On Allowed Applications screen, long tap on the specific user.
-
Tap Remove to complete.
Disable Bottom Bar
Most of the Android devices have an on-screen bar at the bottom of the screen with options to navigate back, home, take screenshots and see recently used applications. Select Disable Bottom Bar option to disable this bar. This option will only disable the bottom bar and not hide it.
Note: Disable Bottom Bar may not work for certain applications.
Hide Bottom Bar
Most of the Android devices have an on-screen bar at the bottom of the screen with options to navigate back, home, take screenshots and see recently used applications. Select Hide Bottom Bar option to completely hide from the screen.
Note:
i. On selecting Hide Bottom Bar, the user has to reboot the device immediately or later.
ii. This feature is supported only on Samsung KNOX devices, rooted devices or devices which are platform signed.
Disable Hardware Keys
Hardware Keys includes Power Button, Home Button, Recent Apps Button and Volume keys of devices (smartphone or tablet). Select Disable Hardware Keys option to disable these hardware keys of the device.
Note: This feature is supported only on Samsung KNOX devices, rooted devices or devices which are platform signed.
Disable Soft Navigation Keys
Soft Navigation keys are Home Button, Recent Apps Button and Back button on the devices (smartphone or tablet). Select Disable Soft Navigation Keys option to disable these keys on the device.
Note: This feature is supported only on platform signed devices.
Assign SureLock System Permission
Use Assign SureLock System Permission option to copy SureLock.apk (setup file) to the system folder.
Note:
i. On selecting Assign SureLock System Permission option, the user has to reboot the device.
ii. This option will avoid users to break the lockdown by enabling safe mode or factory reset of the device and is supported only on rooted devices.
Configure Peripheral Settings
Peripheral Settings allows the admins to restrict or allow the use of Android device peripherals such as camera, WiFi, Mobile Data etc.
Camera Settings
To disable camera from functioning, select Always Disable from the following options:
- Don’t Care
- Always Disable
Wi-Fi Settings
To disable Wi-Fi from functioning, select Always Off from the following options:
- Don’t Care
- Always On
- Always Off
Mobile Data Settings
To disable mobile data from functioning, select Always Off from the following options:
- Don’t Care
- Always On
- Always Off
Note: This feature is supported only on Samsung KNOX devices, rooted devices or devices which are platform signed.
Prefer Mobile Data Settings
Select this option to use Mobile Data as connection preference even when connected to Wi-Fi network.
Wifi Hotspot Settings
To disable Wi-Fi Hotspot from functioning, select Always Off from the following options:
- Don’t Care
- Always On
- Always Off
GPS Settings
To disable GPS from functioning, select Always Off from the following options:
- Don’t Care
- Always On
- Always Off
Note: This feature is supported only on Samsung KNOX devices, rooted devices or devices which are platform signed.
Bluetooth Settings
To disable Bluetooth from functioning, select Always Off from the following options:
- Don’t Care
- Always On
- Always Off
Sound Settings
Use Sound Settings option to set a default sound setting for the device. It has following sound options:
- Don’t Care
- Normal Mode
- Vibrate Mode
- Silent Mode
Loudspeaker Settings
Use Loudspeaker Settings option to set the speaker settings of the device.
Note: Loudspeaker Settings option is enabled when SIM card is present in the device.
Volume Settings
Admin can configure one of the following Volume Settings on the device:
- Set Volume Level - Desired volume level can be set for the device using Volume Slide Bar.
- Note: Minimum value to set for the volume will be 10.
- Set Range of Volume Level – Desired volume range can be set for the device using Volume Slide Bar. Once the range is specified the user can adjust the volume of the device only within the set range.
Airplane Mode Settings
To enable Airplane Mode, select Always On from the following options:
- Don’t Care
- Always On
- Always Off
Note: This feature is supported only on Samsung KNOX devices, rooted devices or devices which are platform signed.
SureLock Homescreen Orientation
SureLock Homescreen Orientation option will set the SureLock Home Screen orientation to either Landscape or Portrait using following options:
- Don’t Care
- Landscape
- Portrait
- Reverse Landscape
- Reverse Portrait
- Auto Landscape
- Auto Portrait
Rotation Settings
Use Rotation Settings to enable or disable rotation of device screen.
To disable screen rotation, turn the device in the desired screen orientation, access SureLock Settings and select Always Off from the following options:
- Don’t Care
- Always On
- Always Off
Note: This option will be enabled only when Watchdog Service is enabled.
Brightness Settings
Use Brightness Settings to adjust and set the brightness of the device screen. The following options are available to select from:
- Don’t Care
- Force Auto Brightness
- Fix Minimum Brightness
- Fix Maximum Brightness
- Lock Current Brightness
Note: This option will be enabled only when Watchdog Service is enabled.
Set Custom Toast Message
Admin can customize the toast message that appears when the user tries to access the unallowed application.
Enable Toast Message
Toast Messages are small notification pop-ups which appear on the screen notifying the users. Once Enable Toast Message is selected, SureLock will notify the users with a toast message when any unallowed application is accessed.
Note: This option will be enabled only when Watchdog Service is enabled.
Set Custom Access Denied Message
Use this option to enable a custom toast message instead of default Access Denied message.
Note: This option will be enabled only when Watchdog Service is enabled.
Watchdog Service
Watchdog Service enables advance lockdown of the device by restricting access to any unallowed application from an allowed application. For example, if Camera is among the allowed applications, the users may access gallery or share the picture using available options on the Camera screen. In this scenario, enable Watchdog Service to restrict the users to access only approved applications and nothing else.
Watchdog Service enables the following settings:
-
Rotation of Screen
-
Brightness on Screen
-
Enable Toast Message
-
Set Custom Access Denied Message
-
Kill unallowed Application
-
On launch of unallowed Application
-
Diagnostic Settings
Kill Unallowed Application
When an Android device is locked down using SureLock and an unallowed application is launched, SureLock blocks the application however, the application remains launched in the background.
Select Kill Unallowed Application option will block all unallowed applications running in the background.
Note: This feature is supported only on Samsung KNOX devices, rooted devices or devices which are platform signed.
Disable Clipboard
Admin can disable copy or paste option in SureLock.
Note: This feature is supported only on specific Zebra devices.
Lock Safe Mode
Like in Windows OS, Safe Mode in Android runs only required settings and applications on the device and does not allow running of any other downloaded apps on the device. Getting into Safe Mode on an Android phone is as easy as pressing and holding phone’s power button for a few seconds. This option will clear the password set for the device and allows any user to access the device.
Lock Safe Mode option in SureLock prevents the user from entering Safe Mode by locking it with a password. When the user tries to enter Safe Mode, SureLock will ask for the password, without which the Safe Mode won’t be accessible.The admin can also set a password for the device as an additional security feature.
Note: This feature is available for devices running Android Marshmallow and below.
To enable Lock Safe Mode, follow these steps:
-
Login to SureLock Admin Settings.
-
On Admin Settings screen, tap SureLock Settings.
-
On SureLock Settings screen, tap and enable Lock Safe Mode.
-
On Activate Device Administrator prompt, tap Activate.
-
On the prompt, enter/select the following details:
- Safe Mode Password
- Confirmation
- Add Device Password
- Device Password
- Confirmation
-
Tap Change to complete.
Disable Safe Mode
This feature will disable Safe Mode option on the device.
Note: This feature is supported only on specific Zebra and LG devices.
On Launch of Unallowed Application
Use On Launch of Unallowed Application option will redirect the user to any of the following screens:
- Home Screen
- Resume Previous Application
- Relaunch Previous Application
Note: This option will be enabled only when Watchdog Service is enabled.
On USB state change go to Home
If the user wants to automatically redirect the screen to SureLock Home Screen when an external device (like the charger) is connected to the USB port, then enable On USB state change go to Home option.
Clear Data on Home Screen Load
Select this option to clear the data of the application (launched in SureLock) running in the background when the user returns to the SureLock Home Screen.
Suppress Notification Panel
Notification Panel refers to a panel that displays the general notifications which can be accessed by simply dragging down the screen from the top. Select Suppress Notification Panel to suppress the notification panel. Once enabled, the users will be restricted from viewing the Notification Panel.
Hide Quick Settings Tile
This option will hide the Quick settings tiles from the Notification panel on Signed and Rooted devices.
Note: This feature is available for devices running Android Lollipop and above.
Block Notifications
Admin can block all applications’ notifications from Notification Panel on SureLock Home Screen.
Note: This feature is supported on all platform signed devices/ all lollipop and above devices.
Disable Status Bar
Status Bar refers to the bar at top of the screen which displays date, time, battery level, network strength, and notifications. The device users can use this bar to access device settings or applications. It has following options:
- None - Status Bar will not be disabled. This setting will be applicable for all devices
- Legacy Mode - Status Bar will be disabled. This setting will be applicable for all devices
- Advanced Mode - Status Bar will be disabled. This setting will be applicable for only platform signed devices.
Disable Factory Reset
Factory Reset allows the user to erase complete data stored in the device. Enable this feature to restrict the users from factory resetting the device.
Note: This feature is supported only on platform signed Lollipop devices / specific Zebra and LG devices.
Disable USB
Enable this option to disable USB storage and USB debugging.
Note: This feature is supported only on Samsung KNOX/Rooted/Platform signed/ specific Zebra devices.
Disable OTG/External SD Card
This option disables the usage of OTG/ External SD card.
Note: This feature is supported only on platform signed/ specific Zebra devices.
Suppress Power Button/Keyboard
Use this option Suppress Power Button/Keyboard to prevent shut down of the device and also disable keyboard of the device.
Keyboard Settings
Some Android devices allows the use of USB port to attach external keyboards. When an external keyboard is attached to a device, the on-screen soft keyboard is disabled.
Select Keyboard Settings option is to enable on-screen soft keyboard even when an external keyboard is plugged in using the USB port.
Note: This feature is not supported by Android Lollipop and above.
Configure Driver Safety Settings
SureLock comes with an inbuilt feature to lock the device screen completely to stop driver’s interaction with the device while driving at a particular speed. This function works in coordination with GPS and allows the user to set a speed threshold for the vehicle to auto lock and restrict all device functionalities.
Note: GPS should be ON and set to High Accuracy.
Enable Driver Safety
Enable Driver Safety option helps the Admin user to set Driver Safety settings.
Enable Driver Safety option enables the following settings:
- Enable Driver Safety Overlay
- Set Driver Safety Overlay Threshold
- Enable Email Alert
- Set Email Alert Threshold
- Alert Email Address
- Enable Driver Safety Profile
Enable Driver Safety Overlay
Select this option to display an overlay on the screen when the vehicle speed exceeds the set overlay threshold.
Enable Driver Safety Overlay option enables the following settings:
- Allow Running Background Applications - Allows applications to run in the background even when driver safety overlay appears on the screen.
- Set Driver Safety Overlay Threshold - Enter the value for Driver Safety Overlay Threshold in Miles/Km. When the vehicle speed exceeds the specified Overlay Threshold then an overlay appears on the screen and will restrict the driver from accessing the device functionalities.
Allow Transparent Overlay
Select Allow Transparent Overlay option to show a transparent overlay on the screen when the driver exceeds the speed threshold set by admin. If driver tries to tap on the screen, driver safety overlay will be visible for only few seconds.
Enable Email Alert
Select Enable Email Alert option to enable email alert service to the admins.
Enable Email Alert option enables the following settings:
- Set Email Alert Threshold -Enter the value for Set Email Alert Threshold in Miles/Km. When the vehicle speed exceeds the Set Email Alert Threshold then an email alert will be sent to the admins.
- Alert Email Address - Enter the admins’ email address to send an alert email to the user, when the vehicle speed exceeds the specified Email Alert Threshold.
Enable Driver Safety Profile
Driver Profile has to be configured before Enable Driver Safety Profile option is selected. The user can select and enter a path to import new settings when the vehicle speed exceeds the specified Driver Safety Profile Threshold.
Enable Driver Safety Profile option enables the following settings:
- Set Driver Safety Profile Threshold - Enter the value for Set Driver Safety Profile Threshold in Miles/Km. When the vehicle speed exceeds Set Driver Safety Threshold then SureLock will import alternate driver profile settings file with specific applications allowed to the user.
- Set Driver Safety Profile Delay (secs) - Enter the value in secs. Admin can set the delay on applying Driver Safety Profile settings on the device.
- Location update interval- Enter the value for Location update interval in secs. SureLock receives the location update at the specified time interval.
Bootup Delay
There might be instances where multiple applications approved in SureLock will need time for proper booting. Bootup Delay option in SureLock will delay the bootup process to allow proper booting of all approved applications.
Configure Timeout Settings
Timeout Settings offers a range of features which can be used for configuring time-based lockdown and device behavior like preventing the device from suspending or redirection activity on idle timeout.
Prevent Suspend Mode
Android device screen goes into sleep mode when the device is idle for a specific period of time depending on the device settings. Enable Prevent Suspend Mode to keep the device screen always On when SureLock is running.
Note: Prevent Suspend Mode enables AC Power Prevent Suspend and Schedule Prevent Suspend Mode and disables Keep CPU On option.
Keep CPU On
Use Keep CPU On option to keep CPU ON when SureLock is running.
AC Power Prevent Suspend
Enable AC Power Prevent Suspend feature to prevent the device screen from going off when SureLock is running and the device is plugged into AC Power.
Note: AC Power Prevent Suspend disables Schedule Prevent Suspend Mode.
Schedule Prevent Suspend Mode
Use Schedule Prevent Suspend Mode feature if the user wants the device running SureLock to get into Prevent Suspend Mode on a specific time and days of the week. This feature gives the option to specify following details:
- Start At
- End At
- Days of the week
Idle Timeout
Select Idle Timeout option to set a period of time for the device to be inactive after which SureLock will redirect the device screen to SureLock Home Screen.
Idle Timeout Application
Select Idle Timeout Application feature to select an approved application to be inactive after which SureLock redirects the screen to Idle Timeout option instead of SureLock Home Screen.
Restart App on Idle Timeout
Enable Restart App on Idle Timeout option if the user wants the locked Android device to wake up after the idle timeout with refreshed app screen.
Reset Brightness Timer on Idle TimeOut
SureLock has multiple features which once enabled save battery consumption by specifying auto adjusting of brightness on device inactivity or redirecting to SureLock Home Screen on device inactivity.
This feature once enabled will reset the timer specified in Brightness on Inactivity to 0 (zero) when the device is inactive.
Example: If Idle Timeout is set as 10 seconds and Brightness on inactivity is set as 15 seconds, the timer for both the activities will start together. When the device is inactive for 10 seconds, it gets into Idle Timeout mode and resets the timer of Brightness on Inactivity to 0 (zero). This cycle continues till the device is in the inactive state.
Configure Schedule Reboot
Use this feature to reboot the device on specified days and time. Select Enable schedule Reboot option to select Change schedule reboot time and Select days for the device to auto reboot on the scheduled time and days.
Note: This feature is supported only on Samsung KNOX devices, rooted devices or devices which are platform signed.
Configure Title Bar Settings
Select Title Bar Settings to enable and customize title bar on SureLock Home Screen.
SureLock Title Bar Settings has following customization options:
- Text - Enter the Title Name
- Note: Title Bar text can be customized by adding SureLock version to it.
- Font Color - Select the desired Font Color from options displayed
- Font Size - Enter the Font Size (in numeric)
- Font Style - Select the desired Font Style from the options displayed
- Font Family - Select the desired Font Family from the options displayed
- Position - Select the desired Position for the text to display
- Enable Gradient - Select Enable Gradient
- Color - Select the desired background color from Pick a Color bar
- Size - Enter the Title Bar Size (in numeric)
- Preview - The user can view the settings applied to the Title Bar
Configure SureLock Analytics
SureLock Analytics option will record SureLock activities such as the name of applications accessed, time spent on the applications, unallowed applications that are blocked and more. The user can also export the records in .csv format.
The export and clearing of analytics data can also be scheduled on a specific day and time using Schedule Export feature under SureLock Analytics.
The following are the options available in Analytics Settings:
- SureLock Analytics - Enable this option to configure SureLock Analytics
- Export Analytics Data - Browse and select the location to export the analytics data in .csv format
- Clear Analytics Data - Clears all stored analytics data
- Schedule Export - Enable this option to schedule export of analytics data to File / Mail / SureMDM.
- Note: Analytics report can be generated from SureMDM Web Console.
- Export At - Set a scheduled time for the export of analytics data
- Days of the week - Select the desired days of the week for scheduled export
- Schedule Export to Mail - Enable scheduled export of analytics to configured email id
- Configure Email - Analytics Data will be exported to the configured email
- Clear Analytics Data After Export - Clears all analytics data after export from the device
Configure Power Saving Settings
Power Saving Settings will save on power consumption by adjusting and setting the brightness of the device.
Note: Power Saving Settings option is enabled when Brightness Settings is set to Don’t Care.
There are following options available in Power Saving Settings:
- Enable Power Saving - Enables power saving option
- Default Brightness - Set the default values for the brightness when the device is connected to Battery/AC Power.
- Note: Brightness values should range between 0 and 255.
- Brightness On Inactivity- Set the value of the brightness when the device becomes inactive after the specified time.
- Brightness On Battery Level - Set screen brightness based on the battery level
- Disable Brightness Change On Third-Party App - Brightness settings on Third party Apps can be disabled.
- Note: Disable Brightness Change on Third-Party App option is supported only on Jellybean and KitKat devices.
Configure Battery Popup Notification
This feature helps the user to show popup notifications and sound alerts when the device battery reaches the specified threshold.
Battery Popup Notification has following options:
- Show Low Battery Popup - Enable this option to configure Battery Notifications
- Configure Popup - Configure the following popup settings:
-
Battery Popup Threshold (%) - Enter the value for Battery Popup Threshold. When the battery level reaches the specified threshold, device user will be notified with an alert message.
-
After Every % Drop In Battery (%) - Enter the value for After Every % Drop In Battery (%). When the specified battery percentage drops from the set threshold, device user will be notified with an alert message.
-
Alert Message - Enter the message to display when battery percentage goes below the specified threshold.
-
Status Bar Color
The user has the option to change the Status Bar Color by selecting a color from the Color Bar.
Note: i. Status Bar Color will be enabled only when Full Screen Mode is disabled.
ii. This feature is supported only for Android versions lollipop and above devices.
Configure Miscellaneous Settings
Miscellaneous Settings enables the admins to set customized SureLock Admin Settings access process and other features like enabling logs in SureLock and disabling touch inputs on the device.
Number of Taps
SureLock Settings password prompt by default can be launched with 5 taps on the screen. A Number of Taps option allows admins to change this default 5 taps to a desired number of taps.
Note: The value entered for Number of Taps should range between 4 and 60.
Access Settings Timeout
The admins can restrict the access to SureLock Admin Settings after a specified time period. Once Access Settings Timeout option is enabled, the password prompt will not appear even if the user taps the required numbers within a specified time.
Note: Once this feature is enabled, to login to SureLock Admin Settings, the device needs to be rebooted.
Admin Login Security
SureLock offers following admin related features. Some of these features require lockdown device that needs to be enrolled in SureMDM.
- Admin Login Security - Select this option to enable Admin Login Security features.
- Block Admin Access after loading SureLock - When this feature is enabled, access to SureLock Admin Settings will be blocked after loading SureLock. The only way to access SureLock Admin Settings is to reboot the device and tap for 5 times while loading.
- Send Mail to SureMDM - This option will be greyed out if the locked device is not enrolled in SureMDM. Once this feature is enabled, the admins get email notifications when the user tries to access SureLock Admin Settings and fails.
- Block login until reboot - Enable this option to reboot the device to access SureLock Admin Settings, when the user exceeds the number of failed attempts specified in Login Threshold.
- Block Login for a specified time - Enable this option to block the SureLock login for a specified time that is set in the Set Prevent Login Time, when the user exceeds the number of failed attempts specified in Login Threshold.
- Block Login until SureMDM notifies - Enable this option to block access to SureLock Admin Settings when the user exceeds the number of failed attempts specified in Login Threshold. SureLock will block access to SureLock Admin Settings until the admins use SureMDM to push the grant login access run script to the device.
- A run script job with the following command should be pushed to the device to grant login access.
- For Blank password: am broadcast -a com.gears42.surelock.COMMUNICATOR -e “command” “allowlogin”
- For Other passwords: am broadcast -a com.gears42.surelock.COMMUNICATOR -e “command” “allowlogin” -e “password” “0000”
- A run script job with the following command should be pushed to the device to grant login access.
- Login Threshold - Use this option to set value for the maximum number of failed attempts by the device users, after which the set features under Admin Login Security gets triggered.
- Send Daily Login Report - Once this option is enabled, SureLock will send daily login report for successful and failed Attempts to SureMDM.
- Send At - Set the time for the Daily Login Report to be sent to SureMDM Web Console.
Send Notification On Exit
Use this option to enable a notification to be sent to following options when the user exits SureLock:
- Notify Through Mail - Enable this option to notify the admins through the email.
- Notify Through SureMDM - Enable this option to notify the admins through SureMDM.
Set Usage Access Warning
This option will be available when Enable Usage Access is disabled under Setup SureLock Permissions. The warning message can be customized as per the requirement.
Note: This feature is supported only on Android versions 5.1.1 and above devices.
Enable Log
Enable this feature to record logging activities of SureLock. Log File records all the events and activities of SureLock and gets saved at a specified location.
Set Log File Path - Browse and select a location for the log file to save.
Send Error Report
This option enables SureLock to collect and send logs and diagnostic information to 42Gears server whenever an error occurs.
Use Advance Hide Bottom Bar
This feature is similar to Hide Bottom Bar which completely hides the bottom bar of the device. Unlike Hide Bottom Bar option, to enable this feature the device does not require a reboot.
Note: This feature is supported only on devices with Android KitKat or below versions.
On Press of Home Button
This option will redirect the users to either Last Accessed Folder or Home Screen when Home button is tapped.
Note: This option is helpful when multiple approved applications are arranged in folders.
Disable Touch Input
Enable this feature to disable touch input on the screen when SureLock is on. Once this option is enabled, the user can only launch SureLock Password Prompt by tapping 5 times on the screen.
Note:
i) Launching of SureLock Password Prompt by tapping on screen 5 times will work even if SureLock is not in focus.
ii) Disable Touch Input is enabled only when Idle Timeout and Brightness on Inactivity are disabled.
Use SDP Calculation
Enable Use SDP Calculation option to use advanced calculation for icon size and font size. This option works based on the different versions of Android.
Note: The user can see the difference in the Font and Icon size when Android is upgraded to Marshmallow and above.
Memory Settings
Use Memory Settings to track memory usage by allowed applications. Once enabled and a Memory Threshold is set, SureLock will automatically clear the open application if the free memory is less than the specified threshold. Admin has the option to hide all prompts on SureLock Home Screen when background processes are being killed.
Screensaver Settings
Use Screensaver Settings option on device inactivity. This option allows only an image to be set as a screensaver and has following options:
- Enable Screensaver - enables screensaver option
- Use System Wallpaper - uses wallpaper of the device as the screensaver
- Select Screensaver Media or Webpage - allows the user to browse and select an image / enter webpage URL for the screensaver
- Screensaver Timeout - allows user to set a time of inactivity for the screensaver to appear
- Note: The time (in secs) set for Idle Timeout should be higher than Screensaver Timeout.
- Load Page In Background - allows loading the page in background even if screensaver is running
Disable Applications
Use Disable Applications to disable launch of any non-native/third-party applications including the ones that are allowed in SureLock.
Note: This option will not list the system applications/native applications and this feature is supported only on Samsung KNOX devices, rooted devices or devices which are platform signed.
Disable Wi-Fi /Mobile Data Access
The admins can activate or deactivate the connectivity preference (WiFi / Mobile Data) for the specific apps.
Unrestricted Data Usage
When Data Saver is ON, device will restrict the data access for all apps in the device. Enable this setting to allow unrestricted data access for the specific apps.
Note: This feature is supported only on Nougat and above signed devices.
Diagnostic Settings
Diagnostic Log refers to the log that has the list of all events when SureLock blocks unallowed applications.
Enabling Diagnostic Log also enables, following options:
- Enable Diagnostic Log - Diagnostic log once enabled will log all activities of allowed/blocked applications and notifies whenever any unallowed application is blocked.
- Set Diagnostic Log Path - Browse and select a folder to save the diagnostic logs.
- View Diagnostic Log - Use View Diagnostic Log option to view the log of all activities in SureLock.
- Clear Diagnostic Log - Use Clear Diagnostic Log option to clear the log entries.
Configure Samsung Knox Settings
Samsung KNOX feature in SureLock is available only for Samsung Android devices with Android 4.2.2 and above. This feature once enabled in SureLock will let advance lockdown of the device without rooting.
There is no rooting required to enable advanced lockdown features in Samsung Knox enabled devices. Select Enable Samsung Knox options to enable the following features:
Set Custom Boot Animation
Samsung devices display an animation of Samsung logo when the device is booting.
Select Set Custom Boot Animation option to play a desired animation file while booting the device.
Note: This feature is supported only when Samsung Enterprise Agent is installed on the device and custom KNOX license key file is placed in the root folder of the SD Card.
Set Custom Shutdown Animation
Samsung devices display an animation of Samsung logo during the shutdown.
Select Set Custom Shutdown Animation option to play a desired animation file during the shutdown.
Note: This feature is supported only when Samsung Enterprise Agent is installed on the device and custom KNOX license key file is placed in the root folder of the SD Card.
Disable Other Home Screens
Android devices can have more than one home screens; inbuilt and downloaded. When Home button is pressed, the user gets an option to select home screen from the available options. Once Disable Other Home Screen option is enabled, it disables all other installed home screens along with device’s default home screen and directs the user to SureLock Home Screen.
Disable Safe Mode
Safe Mode is a diagnostic mode and lets the user boot the Android device with disabled third-party applicants. A user can manually enter Safe Mode by using the Power and Volume buttons. Once the user enters Safe Mode, third-party applications can be disabled and uninstalled.
Use Disable Safe Mode option to prevent users from entering Safe Mode using device hardware keys by password protecting the access.
Disable Factory Reset
This option prevents users from resetting the device to factory settings. This is helpful if Settings is allowed as an approved application and do not want the user to factory reset the device. Once this option is enabled, Factory Reset option gets grayed out.
Disable Multi Window
Multi-window option is accessed through the draggable vertical bar on the left side of the device screen. This option is used for launching applications and arranging them in multi-window view.
Once Disable Multi Window option is enabled, the multi-window accessing option on the devices will be disabled.
Disable USB
This option disables following two ways of USB usages:
- Mass Storage - restricts access to the stored files on the device
- USB Debugging - restricts access to device using Command prompt
Wipe Recent Apps
Once Wipe Recent Apps option is enabled, on the launch of SureLock, the recent applications accessed by the user on the device gets auto wiped.
Disable S Voice
S Voice feature is a virtual mobile personal assistant which is capable of running a large number of tasks through voice command.
This option disables S Voice feature on the Samsung devices.
NFC Mode
NFC (Near Field Communication) is a means of passing data from one device to another over radio waves by touching them or putting them closer.
Use this option in Samsung devices to keep the NFC mode of the device as always ON or always OFF.
Disable Air View Mode
This option disables the Air View which allows you to get a preview of certain types of content without having to touch the display.
Disable Air Command Mode
This option disables Air Command gestures which provides access to signature S Pen features like Smart select, Screen Write, and Samsung Notes.
Disable Smart Clip Mode
The user has the option to block Smart Clip feature on the device. If it set to false, the user will not be able to use the Stylus Pen, Smart Clip, Copy/Paste.
Allow Multiple Users
Use this option to disable Multiple users functionality which allows multiple user spaces on shareable devices such as tablets.
Disable OTA Upgrade
Use this option to disable Over the air updates in Samsung devices.
Disable SD card
This option disables SD card if present in the Samsung devices.
Disable Hardware Keys
This option disables all the hardware keys of the device. These hardware keys include Home, Volume Down, Back, Volume Up, Menu, Recent Apps and Power Button.
Disable Custom Hardware Keys
This option disables the hardware keys such as Volume Up, Volume Down, Home and Flash key of the device.
Disable Power Off
Select this option to block the user from switching off the device or restart the device.
Disable Application Installation
This option disables the user from installing new applications on Samsung devices.
Disable Application Uninstallation
This option disables the user from uninstalling applications in Samsung devices.
Allowed Widgets
Widgets refer to the application’s extension which resides on Android Home Screen for quick access.
SureLock allows the user to create a similar setting on SureLock Home Screen. The user can use options under Allowed Widgets to add and modify app or shortcut widgets.
Add Widget
The user can add the widgets to the SureLock Home Screen.
To add a Widget, follow these steps:
- Access SureLock Admin Settings.
- On Admin Settings screen, tap Allowed Widgets.
- On Allowed Widgets screen, tap Add Widget to list all App Widgets.
- Select the desired application(s) wipdget to allow from the list, and tap Done.
- List of all allowed widgets will get displayed on the Widget Tray of SureLock Home Screen.
Note: The Applications that are added in the Allowed Applications can only be added to the Widgets.
Edit/Remove Widget
Widgets that are added to the Home Screen can be edited or removed.
Widget properties such as Landscape Margin, Portrait Margin, Select Widget Size can be edited in this option. Only Widget Position can be changed from Admin Settings > SureLock Settings > Widget Settings.
To remove an allowed widget, follow these steps:
- Access SureLock Admin Settings.
- On Admin Settings screen, tap Allowed Widgets.
- On Allowed Widgets screen, tap on the widget from the list.
- On Widget Details screen, tap Remove to complete.
Configure Widget Settings
The user can organize the approved widgets in SureLock Home Screen.
Widget Settings has following customization options:
To apply the Widget Settings on the device, follow these steps:
- Select Display Widget(s) to apply settings for the Widget.
- Select Widget App/ Shortcut Title.
- Tap on the position(Top/Bottom/Left/Right) to display the Widget on the SureLock Home Screen.
- Select Widget Settings as Show or Hide.
- Select Widget alignment as Vertical or Horizontal.
- Select Show Widget Tray to display the tray on the SureLock Home Screen.
- Select Landscape Widget Area (in pixels) using the slider.
- Select Portrait Widget Area (in pixels) using the slider.
- Tap Done to complete.
Manage Shortcuts
Shortcuts are links which provide quick access to files, applications or settings. SureLock provides a way to create shortcuts for system settings, documents & applications on its home screen.
Add a Shortcut
To add a Shortcut, follow these steps:
- Access SureLock Admin Settings.
- On Admin Settings screen, tap Manage Shortcuts.
- On Manage shortcuts screen, select Accept new shortcuts and Remove Shortcuts on app install.
-
Tap Add Shortcut. Two types of shortcuts can be created:
System Settings Shortcut
- a. Tap Add Settings Shortcut for System Settings.
- b. Select a shortcut for Android Settings from the list.
Shortcut configuration for the System Settings will be populated.
Application Shortcut
- a. Tap Add App Shortcut for Applications.
- b. Select an App from the list.
Shortcut configuration for the App will be populated.
- Edit the attributes for Icon, Action, Category, Package Name, Class Name, URI, Extras, and Flags.
- Enter the Password to access the shortcut.
- Select appropriate options: a. Restart app on relaunch b. Launch at Startup c. Hide Icon in Home Screen.
- Browse and select Current Path to locate the folder and Move the shortcut to it.
- Once done with configuring the shortcut, tap Test Shortcut to test the shortcut.
-
Tap Save and Done to complete.
Shortcut created will be displayed on the SureLock Home Screen.
Note: The user needs to add the Application or Package to the list of Allowed Applications for the shortcut to work.
Deny Shortcut - Admin can blacklist a specific application downloaded from Play Store. Tap Deny Shortcut and enter the package name to be blacklisted. If the user tries to download the denied package or application from Play Store, shortcut for the denied package will not be created and the user can see the denied toast message on the screen. Delete a Shortcut
To delete a Shortcut, follow these steps:
- Access SureLock Admin Settings.
- On Admin Settings screen, tap Manage Shortcuts.
-
On Manage Shortcuts screen, tap on the desired shortcut.
Details of the Shortcut (Settings/App) will be displayed on the screen.
- Tap Delete to complete.
Configure Phone Settings
Phone Settings option allows admins to manage calls and SMSs on the locked device.
Phone Settings has following options:
- Call Progress Screen - If the device has calling option and SureLock is running, the user can receive calls but Call progress screen may not be visible, which has all the information and options for the ongoing call. Enable Call Progress Screen to make call progress screen visible on the device.
- Block All Incoming Call - Use Block All Incoming Call feature to block all incoming calls.
- Block All Outgoing Call - Use Block All Outgoing Call feature to block all outgoing calls.
- Blacklisted Phone Number - Add phone numbers in Blacklisted Phone Number if the admins have allowed all incoming or outgoing calls in a device and wish to block incoming or outgoing calls for selective phone numbers.
- Whitelisted Phone Number - Add phone numbers in Whitelisted Phone Number if the admins have blocked all incoming or outgoing calls in a device and wish to allow incoming or outgoing calls for selective phone numbers.
- Block All Incoming SMS - Use Block All Incoming SMS feature to block all incoming SMS.
- Block All Outgoing SMS - Use Block All Outgoing SMS feature to block all outgoing SMS.
- Block All Incoming MMS - Use Block All Incoming MMS feature to block all incoming MMS.
- Block All Outgoing MMS - Use Block All Outgoing MMS feature to block all outgoing MMS.
- SMS Command Password - Use this feature to enable SureLock specific SMS commands. This is very useful to reset the device password using SMS, when Nix is offline on the devices.
Note:
i) Phone Settings options will be enabled when SureLock is installed in sim supported devices.
ii) SMS and MMS options are supported only on Samsung Knox devices.
Configure Multi-User Profile Settings
A single device can be shared with multiple users. Each user will be assigned to different set of applications and configurations. Users and Profiles are added from Multi-User Profile Settings.
Note: Multiple users can be assigned with the same profile.
Tap Enable Multi-User Profile to activate the following options:
- Profile Management
- User Management
- Server Configuration
- Display Last Logged In User
Profile Management
Multiple Profiles can be added with the different set of applications and configurations on the Profile Management screen.
To create a profile, follow these steps:
- Access SureLock Admin Settings.
- On Admin Settings screen, tap Multi-User Profile Settings.
- On Profile Management screen, tap Add and enter the Profile Name.
- Tap Ok to complete.
- To add more profiles, repeat steps 3-4.
Note:
i. Default Profile will be active by default.
ii. The admins have the option to Add, Clone, Delete and Edit the profiles.
How to activate a profile and add applications to the profile
To activate a profile and add applications to the profile, follow these steps:
- Access SureLock Admin Settings.
- On Admin Settings screen, tap Multi-User Profile Settings.
- On Profile Management screen, tap More options button of the profile that the user wants to activate.
- Tap Activate.
- Go back to Admin Settings and follow the steps mentioned in Add Allowed Applications to add applications to the profile. The approved applications will get listed on the SureLock Home Screen.
User Management
Admin can add multiple users and associate same or different profile for each user from User Management.
How to add users and assign profile to the users
- Access SureLock Admin Settings.
- On Admin Settings screen, tap Multi-User Profile Settings.
- On Multi-User Profile Settings screen, tap User Management.
- On User Management screen, tap Add.
- On Add User prompt, enter Username, Password , Email Id and select the profile from the drop-down list.
-
Tap Save to complete.
The newly created user will get listed on User Management screen.
- To add more users and assign the profile to the users, repeat steps 3-5.
Note: The admins have the option to Add, Delete and Edit the users.
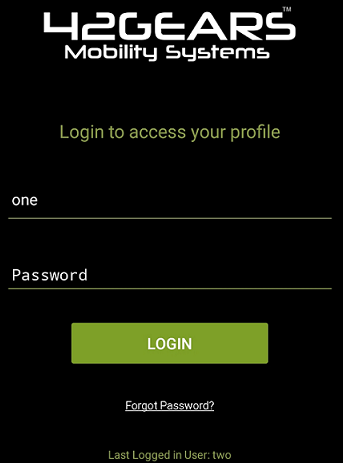
The login screen will get displayed on SureLock Home screen. When the user login with the valid credentials, specified profile gets applied to the device.
Note: In case the user forgets password, enter the User Name and tap Forgot Password. Existing password details will be sent to the configured email.
Server Configuration
The admins can configure LDAP server details on the Server Configuration screen. Use LDAP server for user authentication and apply profile based on the meta tag key.
To configure LDAP server details, follow these steps:
- Access SureLock Admin Settings.
- On Admin Settings screen, tap Multi-User Profile Settings.
- On Multi-User Profile Settings screen, tap Server Configuration.
-
On Server Details screen, enter the Server Path, Port Number, Distinguished Names, Profile Meta Tag key.
Note: The admins should create profiles in Profile Management screen with the value given in Profile Meta Tag Key. If any user login with valid credentials, the desired profile (value given in Profile Meta Tag Key) will be applied to the device.
-
Revoke Access When No Meta Tag/Profile is Found:
i. Enable - Enable this option if Profile Meta Tag Key is not available for the user to avoid the user from logging.
ii. Disable - Disable this option if Profile Meta Tag Key is not available for the user to apply the Default Profile to the device.
- Tap Validate to enter user credentials and authenticate the server details. Then save the server configuration on successful validation.
Display Last Logged In User
Select this option to view Username of the user who was last logged into the Multi-User login screen.
System Settings
The user can make changes in the system settings without exiting SureLock using System Settings option under SureLock Admin Settings.
Setup SureLock Permissions
The admins can activate certain permissions anytime in SureLock. The following options are available under Setup SureLock Permissions:
- Set SureLock as Default Launcher - This option will set SureLock as default Home screen.
- Activate Device Admin - SureLock needs Android administrator permission for the advanced lockdown features such as
- Disable Camera
- Disable Lock Screen
- Encrypt device
- Set Password Expiry
- Lock Device
- Set Password Restrictions
- Reset Device Password
- Monitor unauthorized Login
- Wipe Device
Select this option to activate all the advanced lockdown features.
- Enable Usage Access - Select this option and then enable Usage Access for SureLock. The lockdown features of SureLock will not work until this option is enabled.
- Install and Setup Enterprise Agent - This option will download and install Enterprise Agent on the supported device.
- Enable Samsung Knox - Select this option to enable Samsung Knox features. This feature is available only for Samsung Knox devices.
- Disable USB Debugging - Select this option to restrict access to the device using Command prompt.
- Disable Automatic Update From Play Store - Select this option to stop auto-updating all the installed applications from Play Store.
Configure Import/Export Settings
SureLock’s feature of Import/ Export Settings helps in making the gruesome task of configuring multiple devices with identical settings, quick and easy.
With the option of export or import settings using cloud/file/http, the user can mass configure the devices in almost quarter of the time, generally required. Configuring of multiple devices at a time with cloud option is achieved by just typing unique Cloud ID and tapping on Import.
Export Settings
The admins can configure device settings on multiple devices and export it to a File or Cloud.
Export to File
If the admins want to configure multiple devices with identical SureLock Settings, use Export to File option to export the settings to a file which can be imported into other devices for configuration using external storage device.
Export to Cloud
Select Export to Cloud option to export the settings to the Cloud, if the admins don’t want to save the exported settings to an external storage device.
To export the settings to cloud, follow these steps:
- Access SureLock Admin Settings.
- On SureLock Admin Settings screen, tap Import/Export Settings.
- On Import/Export Settings screen, tap Export to Cloud.
- On Export Settings To Cloud screen, tap and select one of the following options:
- Export Settings To a New Cloud ID - Export the SureLock settings to a new Cloud ID
- Use Existing Cloud ID - Export the SureLock settings to an existing Cloud ID
- Export Settings to Cloud and generate QR Code - Export the SureLock settings to the Cloud and generate QR Code and can save it to a file.
- On successful export to the cloud, a Cloud ID is generated which can be referred while importing the settings.
Note: Cloud ID created will reflect in user Cloud ID History unless it is manually cleared.
Import Settings
The admins can import the SureLock settings from File or Cloud.
Import from File
Use Import from File option to import SureLock Settings from a file.
Import from Cloud
To import settings from the cloud for multiple devices, follow these steps:
- Access SureLock Admin Settings.
- On SureLock Admin Settings screen, tap Import/Export Settings.
- On Import/Export Settings screen, tap Import from Cloud
-
Following are the options available in Import Settings screen,
- Import - Enter the Cloud ID and tap Import or select the Cloud ID from the History
- Scan QR -Tap Scan QR to scan the settings from other devices
- Show QR - Display the QR code generated for the selected Cloud ID
- Clear History - Clears all the Cloud histories that are created.
- The admins will receive a confirmation on the import of SureLock Settings.
Note: Alternate option to Import the settings from Cloud and QR Code is available on the SureLock Home Screen.
Reset Settings
Reset Settings option will reset all settings in SureLock including Allowed Applications list.
Automatic Import
Automatic Import option will import SureLock Settings automatically from a specified File or Cloud ID.
Automatic Import has the following options:
- Enable Automatic Import - Enables Automatic Import option from File or Cloud
- Auto Import From - This option will import SureLock settings from File or Cloud ID.
- Periodically Check - This option is to specify a time period for SureLock to check for new settings to import.
Schedule Automatic Import
The admins can use Schedule Automatic Import to import new settings automatically within a specified period of time.
Schedule Automatic Import has the following options:
Enable Scheduled Automatic Import - Enables the Scheduled Automatic Import option
Start At - Set time to start scheduled import
End At - Set time to end scheduled import
Advanced Settings
Advanced Settings has more advanced options on Import / Export Settings.
Export Activation Code - While exporting the settings to the file, the activation code of the SureLock will be in the encrypted format.
Export Auto-Import Settings - The settings file will have all the settings of SureLock except the Import /Export settings. Enable this option to include Import/Export settings in the settings file.
Force activate license on import settings - While importing SureLock Settings in any device, the SureLock gets automatically activated in the specific device.
SureLock Settings Identifier - Enter the name for the Settings Identifier for the SureLock settings. The admins can identify the applied SureLock Settings with the SureLock Settings Identifier on SureMDM console.
Export Permissions Check List Status - On selecting this option, while importing SureLock permissions on multiple devices, a force prompt of permissions checklist appears for the admins to select appropriately.
Remotely Configure SureLock Settings
The admins can remotely manage the SureLock Applications through SureMDM console. If SureMDM is not installed in the device, it will enable Integrated Nix Agent on tapping Remotely Configure SureLock Settings.
Exit SureLock
This option will exit from SureLock.
To exit from SureLock, follow these steps:
- Access SureLock Admin Settings.
- On SureLock Admin Settings screen, tap Exit SureLock.
- Tap Exit to complete. On successful exit of SureLock, the home screen of the device will be visible.
Uninstall SureLock
Select Uninstall SureLock to uninstall SureLock and its settings permanently from the device.
Note: While uninstalling SureLock, current system settings of the device will not be altered.
About SureLock
About SureLock provides General, Device, License and Diagnostics information of the SureLock Application.
About SureLock has following details:
- SureLock Version - Displays SureLock version installed
- Activate - Option to activate SureLock
- Buy Now - Option to buy the product from Google in-app purchase
- Free Upgrade available till - Displays the date till which user will receive free upgrades
- IMEI - Unique number of the device
- IMSI - Unique number to identify user of a cellular network
- MAC (WiFi) - a unique identifier assigned to network interfaces for communications on the physical network segment
- MAC (Bluetooth) - a unique identifier assigned to network interfaces for communications on the physical network segment
- GUID - Unique reference number used as an identifier in computer software
- Preferred Activation ID - Option to specify ID used for activation
- Deactivate - Option to deactivate SureLock
- Rate App on Play Store - Option to rate the App on Play Store
- Export Log Files to Cloud - Use this feature to export SureLock’s Device Logs, Settings File, and Diagnostic Logs and send it to Cloud. Once the user exports the log files to Cloud will get a Cloud ID which can be shared. Using this Cloud ID, the log file can be accessed anytime, anywhere.
- Install Diagnostics - Option to install SureLog to maintain logs.